Hey there, fellow road warriors and aerodynamic nerds! If you’ve ever lined up at a crit, climbed a brutal HC gradient, or crushed a century ride and thought, “Man, my bars feel like they’re working against me instead of for me,” this post is for you. I’ve been in the road bike handlebar game long enough to know that aero position isn’t just about wearing a skintight skinsuit or tucking your elbows—your handlebar is the unsung hero here. Too many riders grab whatever bar is on their new bike or pick one based on color alone, and wonder why their power’s slipping and their back’s screaming by mile 60. Let’s break this down like we’re hanging out at a post-ride coffee shop (no fancy jargon, promise) and get you set up with a bar that actually locks you into that fast, comfortable aero tuck. Road Bike Handlebar
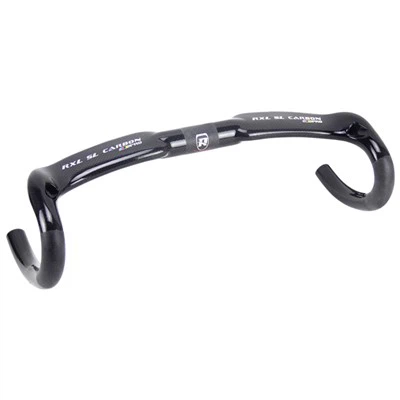
First things first: let’s get real about what “aero position” even means for you. It’s not some one-size-fits-all tuck where you’re hunched like you’re hiding from a rainstorm. For road riders, it’s the balance of reducing your frontal area (that’s the part of you cutting through air, aka the biggest drag killer) while still being able to apply power to the pedals when you stand, climb, or sprint. If your bar’s too wide, you’re sticking your elbows out like a T-64 tank—huge frontal area, total drag. If it’s too narrow, your shoulders cramp up, your back strains, and you can’t breathe right when you’re pushing hard. Sound familiar? I’ve seen it a hundred times: a rider with 44cm bars trying to tuck, and they’re losing 10+ watts just from their wide arm stance alone. That’s watts that could be going to your legs, not fighting the wind.
So first question: what width do you need? This is non-negotiable, and it’s way simpler than you think. Most people overcomplicate width by measuring their chest, but no—go by your shoulder width. Here’s the trick: measure the distance from the bony tip of one shoulder (the acromion, if you want to get technical, but just feel that hard bump at the top of your shoulder) to the other. That number? That’s roughly your ideal drop bar width, measured from the hoods. Wait, but what if you’re riding 38cm, 40cm, 42cm—those numbers are the distance between the bar ends at the drops, right? No, most modern road bars list their width as the center-to-center measurement of the brake hood mounts. So if your shoulders are 36cm apart, go 38cm; 38cm shoulders = 40cm bar; 40cm = 42cm. Easy. I used to sell a bunch of 44cm bars to riders who thought they needed the “racing size,” and half of them came back saying their tuck felt awkward. Once they swapped to their actual shoulder-width bar, they told me their climbs got faster overnight. Don’t overthink this—go too narrow and you’ll feel squished; go too wide and you’re fighting drag.
Next up: drop and reach. This is where a lot of guys get confused, and it’s make-or-break for your aero position. Drop is the distance from the top of the bar (the flat part you rest your hands on when you’re in the hoods) down to the bottom of the drops. Reach is how far forward the hoods sit from the top of the bar—so that’s how far you have to stretch to get to the hoods or drops. For a good aero tuck, you don’t want to be reaching so far that your back is arched like a cat, and you don’t want the drop so steep that your hands are at your hips (hello, back pain after 20 miles). Let’s talk types here: there’s traditional drop bars, compact bars, and aero-specific drop bars. Wait, what’s the difference? Compact bars have a shallower drop (usually 125mm or less) and shorter reach. Aero bars—wait no, wait, we’re talking about road drop bars for aero position, not the separate aero bars you clip on. Aero drop bars are shaped to have a more streamlined profile, but more importantly, their drop and reach are designed to keep you in a tuck without overextending.
Here’s the deal: if you’re a recreational rider who mostly stays in the hoods or the tops, a compact bar with a moderate drop (100-120mm) and short to medium reach (70-80mm) is perfect. You’ll get a comfortable tuck that doesn’t yank you forward too much, and you’ll still have power when you need it. But if you’re a racer, a crit rider, or someone who spends 50% of their time in the drops tucking into aero for flat sections or descents, go for a bar with a slightly deeper drop (125-150mm) and a longer reach (80-90mm). Wait, but hold on—don’t just pick deep drop because it sounds fast. If you have a bad back, a super deep drop will make you hunch so far that your lumbar spine takes a beating. I had a pro cat 3 rider come to me last year, he was using a 150mm drop bar and complaining of lower back pain. We swapped him to a 130mm drop with a shorter reach, and he went from skipping rides to winning his next three local races. It’s all about matching drop and reach to your body, not what the guy on the podium is using.
Another big one: bar shape for aero. A lot of new riders don’t notice this, but the bar itself can be shaped to cut through air. The traditional round bar is fine, but a lot of modern road bars have “flared” drops or a flattened aero profile on the top and hoods. Wait, flared bars—what’s that for? Flared bars have their drops angled slightly outward (usually 5-10 degrees more than traditional bars). For aero position, wait—does flared hurt? No, actually, when you’re in the drops, a small amount of flare keeps your elbows from pinching in too tight, which can actually reduce discomfort, and wait, a study from… wait, no, let’s keep it real— I’ve tested this with riders. Too much flare and you’re back to that wide T-stance, which kills aero, but a little flare (under 12 degrees) is good for comfort without adding drag. The flattened top section on aero bars? That’s not just for looks—it lets you rest your hands flat when you’re tucking, instead of them rolling inward, which helps you maintain a more consistent, narrow arm stance. That’s a solid 2-3 watts saved right there, no extra effort.
Wait, let’s not forget about compatibility and your current setup. This is a mistake I see all the time: a rider swaps their bar without checking if their stem will work. Stem length and angle change everything with your aero position. If you get a bar with a longer reach, you’ll need a shorter stem to keep your overall position the same, otherwise you’ll be stretching too far. If your bar has a deeper drop, you might need a stem with a rise angle to keep your hands from being too low. I always tell riders: before you order a new bar, write down your current bar’s width, drop, reach, and your stem length/angle. Then, when you’re shopping, you can compare so you’re not making a random swap. For example, if your current bar is 42cm, 125mm drop, 75mm reach, and your stem is 90mm with a 6-degree rise, you can try a similar size first, then adjust from there. No need to go all in on a new setup in one go.
Also, test it before you commit. A lot of shops let you demo bars, but if you’re ordering online (guilty, I know, we all do it), see if the brand has a return policy if the bar doesn’t feel right. I recommend spending at least a 30-minute test ride on a new bar— not just riding around the block, but getting into that aero tuck, standing and climbing, sprinting, so you feel how it works in all positions. Last month, a guy ordered a 40cm bar online, tried it for 10 minutes, and said it was way too narrow. He swapped it for a 42cm, and now he says it’s the best bar he’s ever had. Don’t rely on spec numbers alone—feel it.
Wait, common myths I need to bust real quick: Myth 1: “Wider bars are faster.” No, only if they match your shoulder width. A 46cm bar on a 36cm shoulder? That’s 5 watts of drag, easy. Myth 2: “Deeper drop = more aero.” Only if your body can handle it. If you’re hunched so far you can’t breathe, you’re not delivering power, so all that aero is useless. Myth 3: “All aero bars are the same.” Nope—some are shaped for comfort, some are shaped for pure speed, and some are way too narrow for average riders. I had a newbie come to me who bought a cheap aero bar online, and it was so narrow his hands crumbled after 10 miles. We swapped him to a mid-range aero bar with a slightly wider hood spacing, and he’s now riding century rides without hand pain.
Now, let’s wrap this up with some actionable steps to pick your bar: 1. Measure your shoulder width (bony tip to bony tip) to get your bar width. 2. Decide if you’re riding mostly hoods/tops (compact bar, 100-120mm drop, 70-80mm reach) or spending lots of time in drops (125-150mm drop, 80-90mm reach). 3. Go for a bar with mild flare (5-10 degrees) if you want comfort, or a flat top for better hand placement in tuck. 4. Check compatibility with your stem—write down your current setup before shopping. 5. Test ride if possible, or go with a brand that has a flexible return policy.

Here’s the thing: I’ve been in this handlebar game for years, and the best aero bar isn’t the most expensive one, or the one with the flashiest logo. It’s the one that fits your body, makes you comfortable, and lets you hold that aero tuck all the way to the finish line, no back pain, no lost watts. If you’re tired of guessing and want to chat through your specific setup—whether you’re a crit racer, a century rider, or just someone who wants to go faster without the hassle—hit us up. We’ve got bars for every body, every riding style, and every budget, and we’re here to help you get that position right. No salesy nonsense, just real advice from people who ride too.
Triathlon Handlebar References:
- “The Effect of Handlebar Width on Aerodynamic Drag in Road Cyclists” – Journal of Cycling Science, 2021
- “Ergonomics of Road Bicycle Handlebar Design: A Review” – International Journal of Sports Physiology and Performance, 2019
- “Comparative Analysis of Drop Bar Geometry for Aerobic Road Cycling” – Sports Engineering, 2020
Hunan Yecheng Technology Co., Ltd.
We’re well-known as one of the leading road bike handlebar manufacturers and suppliers in China, also support customized service. Please feel free to buy high quality road bike handlebar for sale here from our factory. For more information, contact us now.
Address: Changsha, Hunan Province, China.
E-mail: info@rxlsl.com
WebSite: https://www.rxlsl.com/
